Blinking an LED on ESP32 with Rust
🔧 Introduction
When starting with ESP32 and Rust, it’s tempting to jump straight into complex IoT projects with sensors, Wi-Fi, and cloud integration. However, for beginners (and even for experienced developers exploring Rust on embedded systems), the best approach is to start simple. Building and understanding small circuits helps you get familiar with the board, GPIO pins, the Rust toolchain, and the flashing process, without overwhelming yourself.
In this tutorial, we’ll begin with one of the simplest yet most illustrative projects: blinking an external LED. This project will teach the basics of:
- Designing simple electrical circuits
- Connecting components to ESP32 GPIO pins
- Writing Rust code for embedded systems
- Compiling, flashing, and running firmware on the ESP32
- Observing real-world results
By completing this tutorial, you’ll gain confidence and a solid foundation for moving on to more complex projects like controlling multiple peripherals, integrating sensors, or building small IoT devices.
Even though the circuit is simple, it demonstrates important concepts like current limiting with resistors, using GPIO pins correctly, and linking Rust code to hardware.
So let’s take it step by step, and make our first LED blink!
📐 Circuit Design
Before writing code, let's plan the electrical circuit.
Components:
- ESP32 DevKit or ESP32S Expansion Board
- LED
- 220–330 Ω resistor
- Breadboard and jumper wires
Circuit Connection:
- D5 (GPIO5) on ESP32 → resistor (220–330 Ω)
- Resistor → anode of LED (long leg)
- Cathode of LED (short leg, flat side) → GND on ESP32
Schematic:
ESP32 D5 ---[220Ω]---|>|--- GND
LED
Or in graphical mode:
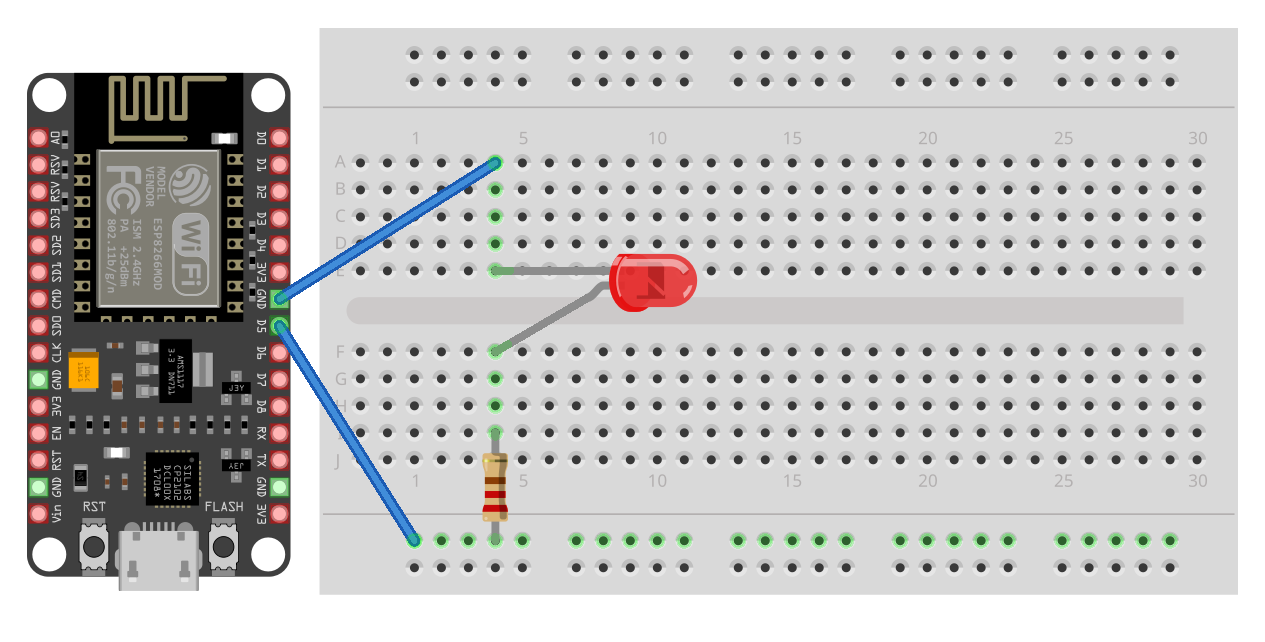
This simple setup demonstrates digital output: setting the GPIO high lights the LED, and setting it low turns it off.
💻 Rust Project Setup
We’ll start by generating a new project using the official Rust ESP-IDF template:
Add the HAL dependency:
This crate provides the hardware abstraction layer to control pins, timers, and other peripherals.
📝 LED Blinking Code
Open src/main.rs
use PinDriver;
use *;
This code sets up logging, configures GPIO5 as an output, and toggles the LED every 500 milliseconds. The logs appear in the serial monitor, giving you feedback on what the program is doing.
🔌 Build and Flash
To build
In /home/<your_user>/esp32-diod-blink/target/xtensa-esp32-espidf/release/ will be places files:
- bootloader.bin
- partition-table.bin
- esp32-diod-blink
Convert esp32-diod-blink the ELF file to a flashable binary (esp32-diod-blink.bin).
Full step-by-step installation guide available on my Patreon: [step-by-step guide on Patreon].
Connect your ESP32 and flash the firmware (check COM port name):
esptool --chip esp32 --port COM3 --baud 460800 write_flash -z 0x1000 bootloader.bin 0x8000 partition-table.bin 0x10000 esp32-diod-blink.bin
📺 Monitoring Results
You should see the LED blinking in real life and logs alternating "LED ON" and "LED OFF" in the monitor.
And also if you open a serial monitor (for example, PuTTY) you will see log messages on each on\off cycle.
YouTube video
Link to [YouTube demo]
🎉 Result and Next Steps
🎉 Conclusion and Next Steps
By completing this project, we learned how to:
- Design a simple electrical circuit
- Wire an external LED safely to the ESP32
- Write Rust code for embedded hardware
- Compile, flash, and monitor logs on your ESP32
Next, we can expand this project: for example, create a simple semaphore with multiple LEDs, add buttons, or integrate basic sensors. Starting with small, manageable projects builds a solid foundation for more complex embedded Rust development.